Configuring Process Stop Reasons for Manual Processes
Desktop Work Tracker provides organization employees with a tool for defining Process Stop Reasons for manual processes. These Process Stop Reasons then enable management to track agent activity on manual processes, which are defined in the Business Logic (see Configuring a Manual Process (Desktop Work Tracker) for details).
Desktop Work Tracker includes three system-based stop reasons that are preinstalled with the system:
Shut Down
Time Out: If the manual process has been configured with a preset timeout and the process reaches its timeout, this Stop Reason will be applied as relevant (seeStep c in Configuring a Manual Process (Desktop Work Tracker) for details).
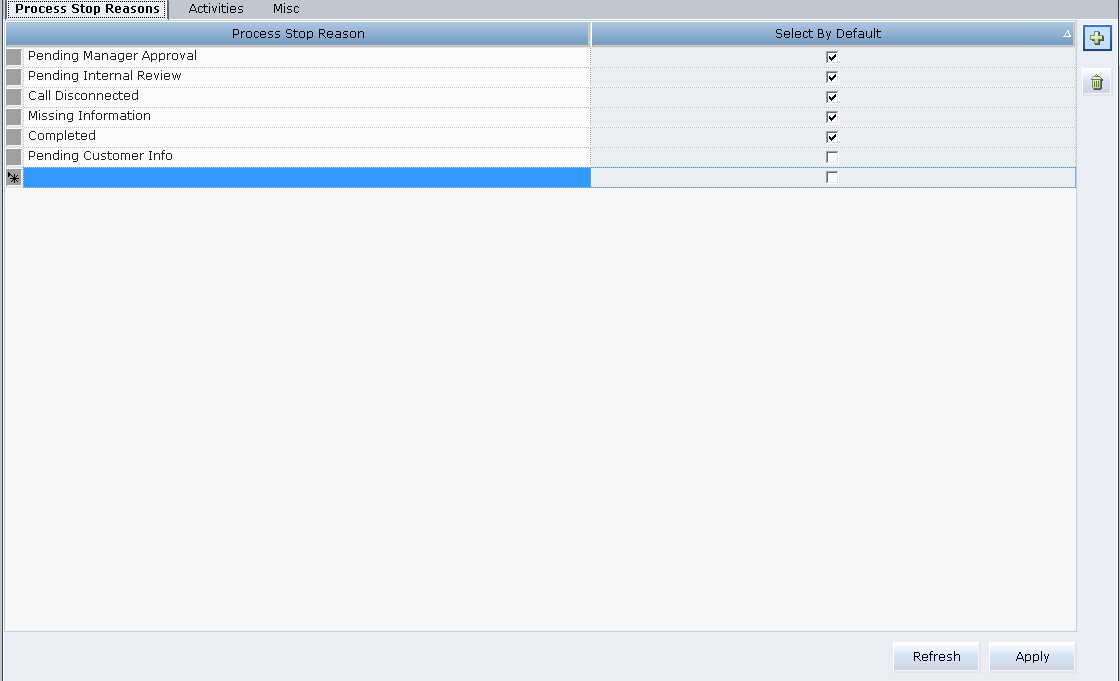
Completed: This reason will appear in the Process Stop Reasons list by default, and can be deleted or modified as needed (see below for details).
If you do not set any Process Stop Reasons in the Desktop Work Tracker, only the system-based reasons will be included for the manual processes. The reasons Shutdown and Time Out will not appear in the Real-Time Designer or Real-Time Client, but will be used by the system in the relevant situations (when the Real-Time Client shuts down or when the process times out).
You may add reasons, edit existing reasons, and delete reasons. Because multiple users may be accessing the system at the same time, you may want to refresh the list of Process Stop Reasons before making changes. The Process Stop Reasons will be displayed alphabetically in the setup but according to their defaults in the selection.
The maximum number of stop reasons per process can also be configured. See Performing Additional Miscellaneous Configurations.
To add, edit or delete Process Stop Reasons:
| 1. | In the Administration module tree, navigate to Desktop Process Monitor > Desktop Work Tracker and select the first tab, Process Stop Reasons. |
The Process Stop Reasons tab displays the current Process Stop Reasons in alphabetical order.

| 2. | Click  . . |
A row is added to the list of reasons.
| 3. | Enter a Stop Reason in the new row. The reason should not exceed 25 characters. |
| 4. | To add the next reason click the space under the existing reasons and then click to add a new row. |
| 5. | When you have finished adding Process Stop Reasons, click Apply to save your changes. |
Real-Time Designer will display a notification that your changes were applied successfully.
The reasons will be displayed in the Monitoring tab; see Defining Process Monitoring in Real-Time Designer for details.
| 6. | To edit an existing reason, select it, modify the reason name and click Apply to save your changes. |
Real-Time Designer will display a notification asking that your changes were applied successfully.
| 7. | To delete an existing reason, select the reason (or select multiple reasons from the list by holding down your mouse) and click  . . |
| 8. | When asked to confirm the deletion, click Yes to delete. |
If you delete a Process Stop Reason and it is already assigned to a process, the Process Stop Reason will be displayed with an asterisk next to it in the Monitoring tab; see Defining Process Monitoring in Real-Time Designer for details.
Setting Default Process Stop Reasons (Optional)
When configuring Process Stop Reasons, you may specify which reasons should be set as the default ones applied to each process. These will then be displayed in the Desktop Work Tracker Client (see Using the Desktop Work Tracker Client for details). However, if you change the default Process Stop Reasons on a per-process basis in the Business Logic, the default Process Stop Reasons displayed will differ from process to process.
To change the default Process Stop Reasons
| 1. | In the list of Process Stop Reasons, select the checkboxes of the reasons you wish to set as default. The maximum number of default reasons is limited to five. |
| 2. | Click Apply to save your changes. |